快速开始
在一切之前,默认你已经部署好一个 NoneBot2 的实例,并且已经成功运行。
还没有?请参考 nOneboT的快速上手 章节。
这是一个简单的实例,展示了SAA的基础使用方法
安装
在这里将使用 nb-cli 来安装 SAA 插件
nb plugin install nonebot-plugin-send-anything-anywhere
示例
接下来,我们将使用 SAA 来实现一个经典的插件:nonebot-plugin-weather
用户查询
我们假设有这样一个需求:用户输入 天气 <城市>,机器人将会返回该地的天气信息。
from nonebot.rule import to_me
from nonebot.plugin import on_command

weather = on_command("天气", rule=to_me(), aliases={"weather", "查天气"}, priority=10, block=True)

@weather.handle()
async def get_weather():
    pass  # do something here
接着,插件应该去调用一个天气API,获取天气信息,然后将信息发送给用户。
然后需要将文本信息发送给用户,这里我们使用 SAA 插件来实现。
在调用 SAA 插件之前,需要先 require("nonebot_plugin_saa"),以确保插件已经被加载。
还需要注意的是, 与安装所用的包名 nonebot-plugin-send-anything-anywhere 不同,这里使用的是 nonebot_plugin_saa。
对于获取到的天气文本信息,需要先使用 Text 来包装,然后使用 send 来发送。
from nonebot import require, on_command
from nonebot.rule import to_me
from nonebot.adapters import Message
from nonebot.params import CommandArg

require("nonebot_plugin_saa")
from nonebot_plugin_saa import Text

# 函数模拟了一个对天气API的异步请求用以演示
# 这里用一个固定的字符串返回替代请求结果
async def weather_api(city: str) -> str:
    response: str = "柳州: 🌦   +14°C"
    return response

weather = on_command("天气", rule=to_me(), aliases={"weather", "查天气"}, priority=10, block=True)

@weather.handle()
async def get_weather(args: Message = CommandArg()):
    if location := args.extract_plain_text():
        result = await weather_api(location)
        await Text(result).send()
    else:
        await Text("请输入要查询的地点").finish()
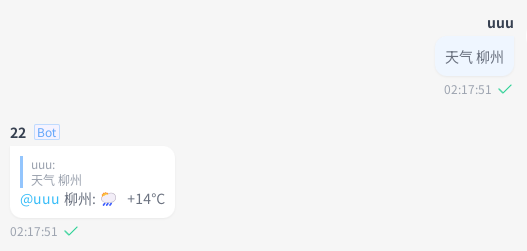
可能在 Bot 发送天气消息时,我们希望 Bot 能同时 @用户并回复
# ...
@weather.handle()
async def get_weather(args: Message = CommandArg()):
    if location := args.extract_plain_text():
        result = await weather_api(location)
        await Text(result).send(at_sender=True, reply=True)
    else:
        await Text("请输入要查询的地点").finish()
这样,当用户输入 天气 柳州 时,Bot 将会回复消息,并在消息前 @用户

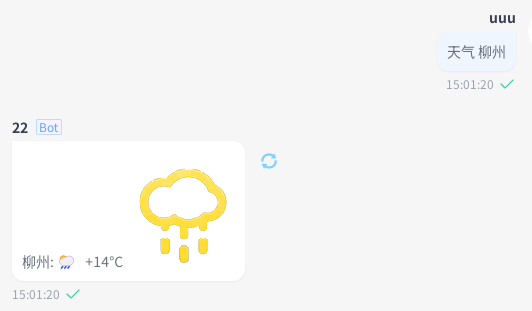
也可以进行图文混排,这个时候,我们需要使用 Image 来包装图片,并且使用 MessageFactory 来组装文本和图片。
from pathlib import Path
# ...
from nonebot_plugin_saa import Text, Image, MessageFactory

assets_path = Path("/资源文件夹路径")

# ...
@weather.handle()
async def get_weather(args: Message = CommandArg()):
    if location := args.extract_plain_text():
        result = await weather_api(location)
        await MessageFactory([Text(result), Image(assets_path / "rainy.png")]).send(
            at_sender=True, reply=True
        )
    else:
        await Text("请输入要查询的地点").finish()

上文中,我们使用了 Text 和 Image 来包装文本和图片,这些都是 SAA 内置的消息段类型。
所有的消息段类型参见 消息构建 章节。
定时推送
另一种常见需求是用户希望 Bot 能定时向用户推送天气消息,例如每天早上 7 点通过私聊推送当天的天气。
from nonebot import require, on_command
from nonebot.rule import to_me
from nonebot.adapters import Message
from nonebot.params import CommandArg

require("nonebot_plugin_saa")
from nonebot_plugin_saa import Text, SaaTarget

weather_report = on_command(
    "每日播报", rule=to_me(), aliases={"weather_report", "定时天气"}, priority=10, block=True
)

@weather_report.handle()
async def report_weather():
    pass
定时任务的创建和执行可以通过官方插件 nonebot-plugin-apscheduler 来实现。
在这个需求中,需要发送的目标存储起来,然后在定时任务中读取并发送。
这里需要关注的是如何获取 SAA 可使用的发送目标(PlatformTarget)。
PlatformTarget 是 SAA 用来表示一个可发送目标的类,它记录了需要发送到的平台、目标ID等信息。
所有可用的 PlatformTarget 参见 消息发送 章节。
SAA 提供了一个便捷的依赖注入来获取 PlatformTarget,即 SaaTarget
from typing import Dict, Any, Tuple, Annotated
from nonebot import require, on_command, logger
from nonebot.rule import to_me
from nonebot.adapters import Message
from nonebot.params import CommandArg, Depends

require("nonebot_plugin_saa")
require("nonebot_plugin_apscheduler")
from nonebot_plugin_apscheduler import scheduler
from nonebot_plugin_saa import Text, SaaTarget, PlatformTarget, enable_auto_select_bot

enable_auto_select_bot()

def scheduler_job_builder(location: str, target_dict: Dict[str, Any]):
    async def job():
        result = await weather_api(location)
        await Text(result).send_to(target=PlatformTarget.deserialize(target_dict))

    return job


def extract_location_and_hour(args: Message = CommandArg()):
    logger.info(f"func: {args}")
    if args:
        location, hour = args.extract_plain_text().split()
        logger.info(f"func: {location} {hour}")
        return location, hour
    return "", ""

# ...

@weather_report.handle()
async def report_weather(
    args: Annotated[Tuple[str, str], Depends(extract_location_and_hour, use_cache=False)], target: SaaTarget
):
    if not target:
        await Text("无法提取SAA Target").finish()
    location, hour = args
    if not all((location, hour)):
        await Text("请正确输入要查询的地点和小时").finish()

    scheduler.add_job(
        func=scheduler_job_builder(location, target.dict()),
        trigger="cron",
        hour=hour,
        id=f"weather_report_{'_'.join(map(str, target.dict().values()))}",
        max_instances=1,
    )
    await Text("已开启定时天气报告").send()
在 Bot 主动发送消息的场景中,SAA 需要使用 send_to 来传入 PlatformTarget。
在例子中我们启用了 enable_auto_select_bot,这样 SAA 将会自动选择一个可用的 Bot 来发送消息。
这样就无需显式获取一个 Bot 实例传入 send_to 了。
详细的介绍参见 自动选择Bot 章节。
对于用户主动触发的场景,直接使用 send 即可。
例子的代码中额外使用了 target.dict() 和 PlatformTarget.deserialize(target_dict) 来演示 PlatformTarget 的序列化和反序列化。